Showing posts with label photography. Show all posts

Monday, January 16, 2012

2011 November/December Colorful ColoRADo eZine

November/December 2011

Welcome to my fantasy eZine "Colorful Colorado." Every two months, I include the best photos from my wanderings. One shot gets a glorified position on the 'cover' made with FD's Flickr Toys Magazine Cover application over at Big Huge Labs

December is one of my favorite months for light painting because everyone puts up  a target to capture.

Night riders
Simply taking a shot of Christmas lights doesn't qualify as a light painting, but there are lots of ways to manipulate static sources to create LPs. You can also add elements to existing lights such as was done in the magazine cover photo. In this case I both manipulated the tree LEDs by using a zoom and focal pull, then added the tinsel effect with glow sticks. Winter also gives more dark hours that are conducive to LPing. This year the extended family and neighbors set up a night sled run "Night riders," which resulted in some crazy trails. Permanent lights can also add to a scene nicely. Here on "Happy 2012," we have some creepy looking snowmen, actually a snowman and woman that had the benefit of being located close to an outdoor lit tree.
Happy 2012!
Spinning wool is something that is pretty well frowned upon in these parts, the fire danger is nothing to mess around with. You don't want to be the one that burned down a bunch of homes for a photograph. But when there is 3 feet of snow on the ground, we can relax a little. Maybe January will bring some spin outings. I have been dreaming up a massive spin taken from a high vantage point using a snow sculpture somehow. We'll see if mother nature dumps the crazy white stuff on us again.

Once every few years we get lucky enough to witness partial or even better - full eclipses. I now own a filter that will allow shots of full solar eclipses. The moon anyone can shoot without any extra gear. Of course longer lenses and telescopes make for the most dramatic captures, but I've seen some really cool wide shots of eclipses with interesting foregrounds as well.

16:9 for Michael

This year we had a setting moon at dawn which presented some better opportunities for foregrounds. All I had was the continental divide but it added interest. The tough part here is getting detail on the darkened area of the moon without blowing out the lit area too badly. Its a tough balance, and there is no neutral density filter in the shape of a crescent that I know of. Cokin used to make gels that you could cut to any shape.  Hmm, customizable ND sheets? I suppose you could hold a square filter up to take the edge off. In this case the moon had set before full eclipse was in view so there was no timing this any better. If you do have a full view of of the eclipse in its entirety, then the light conditions become much easier with the equally distributed earth glow. Make sure you don't lose the moon's position after the crescent is gone. It can be tough to find it in full shadow if you have lots of light pollution or a thin veil of clouds.


Earth Shine Shine
I have been interested in stencils for LPing for some time now and have created quite a few. This can be done using thin printed material or cutting out thicker stock where you want light to pass through. A more in-depth stenciling article coming soon. Smart phones are a great little light source and I've started playing around with using them as stencils. Here is a shot of the Planets app earth in 3D that I used against the night sky. The "stencil" I created was a piece of black construction paper a little larger than the phone case. A circular hole was cut in the size of the planet (which you can adjust using the zoom feature) to prevent the border ares from leaking through. With all the apps out there, not to mention even just using pictures, the smart phone may become my stencil of choice.

Shutter releases. How many have you lost? Been disappointed with? Broke? Were not willing to throw down the big bux on? Always needed more short-lasting obscure batteries? Yeah, me too. So actually this is not really a review but a few thoughts on what works for me and what doesn't. There are two categories roughly. Wired and wireless. I  have owned them both. Plenty of each version. I can only speak for the Canon side but why every DSLR doesn't ship with a SR is a mystery to me. And while I'm venting, why stop at 30 seconds in manual mode? If you're going to include bulb mode then include the release. First, wireless remotes are great for starting and stopping the shot exactly when you want to if you are going to do work in the scene. Two things - they are easy to lose and the batteries are often not lasting very long and not standard. Wired remotes are easier to keep track of (I just Velcro mine to the tripod) but they require activation and deactivation at the camera. Not much better than using the mirror lockup, although you don't get any shake. These can be useful with extended features like an intervalometer. I recommend having both. I can give a slightly positive recommendation for this wired unit (Amazon), but have not been completely satisfied with the wireless remotes I have tried. The best of all of them had a flash shoe mount receiver and a small release with an antennae. I almost always forgot to switch off the receiver and was always replacing the expensive and rare battery. If it could get its power from the camera instead, that would be a nice enhancement. If you have found a better mousetrap, please leave me a comment!


Sunday, January 1, 2012

2011 September/October Colorful ColoRADo eZine Edition

September/October 2011

Welcome to my fantasy eZine "Colorful Colorado." Every two months, I include the best photos from my wanderings. One shot gets a glorified position on the 'cover' made with FD's Flickr Toys Magazine Cover application over at Big Huge Labs. This is a catch-up effort for the blog. 
BellBaby
Coffee Pot Road - Looking SE towards Vail
Obligatory collection
One of the truly special times for outdoorsy types of all stripes in Colorado is the fall. Some years are better than others but being that I don't get to witness the East Coast spectacle often I get pretty worked up about the aspen colors. Especially reds. Sometimes even close to a purple or maroon, but rare indeed. This year was a banner year with the season stretching the longest in recent memory. Usually you can count on a week or 2 in both September and October, but I saw leaves in August and November. After a Sunday drive through the scenic areas we know and love my wife convinced me to take a western slope trip and get some leaf shots. It's the best kind of trip - spur of the moment, completely spontaneous. And I was glad I did. The cover and BellBaby (Bells shot with Lensbaby) shots hint of the magic at the Maroon Bells, which are magic really at any time of year. McClure Pass and Kebler Pass are at the top of my aspen pilgrimages but I found a new fave this year at Coffee Pot Road in the Flattops Wilderness, which sported huge orange stands in groups dotted across rolling hills.

Shine on
While we're talking about Lensbaby, the creative aperture possibilities have always intrigued me. One of my earliest was shot with a LB Original and a custom cardboard cutout in the shape of the Star of David. The light sources pass through the aperture and take on the shape if out of focus. Advancing to better systems, I've purchased a LB Composer and am planning to get a sheet of 8x11 magnetic stock to cut the apertures from. Lensbaby actually contacted me directly to submit my design for the new creative aperture kit, but I was in between LBs at the time. Bummer.

Here is the compete eZine set on Flickr with more uploads.

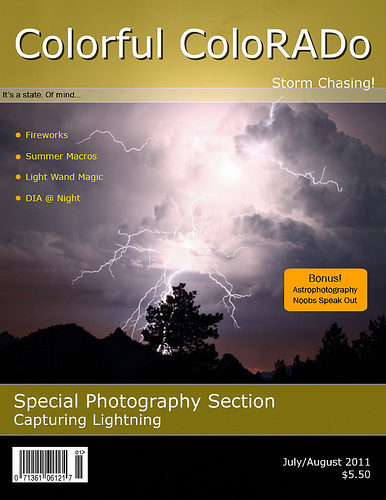
2011 July/August Colorful ColoRADo eZine Edition

July/August 2011


Welcome to my fantasy eZine "Colorful Colorado." Every two months, I include the best photos from my wanderings. One shot gets a glorified position on the 'cover' made with FD's Flickr Toys Magazine Cover application over at Big Huge Labs. This is a catch-up effort for the blog. 

Cold hearted orb that rules the night
Summer is always a good bet that lightning will be popping over the plains giving us a top deck seat up here in the foothills. Anyone can grab a bolt or 2 or even more simply by letting the shutter hang open for long periods. I once had the good fortune of manually opening the shutter in bulb mode  expecting to keep it open for about 30 seconds and so had the aperture and ISO adjusted accordingly. To my surprise, a huge bolt scared my finger off the release and at that moment the "get the best lightning shot in the shortest amount of time" contest was born. Of course I'm only competing against myself at this point. To date, I haven't done better than 1 second in the 'Cold hearted orb' shot, which of course it is too dark and greyscaled (based on my settings), but I keep trying. The cover shot was set up much better and happened in about 8 seconds. Keep trying, the more you take the better your chances...

Love, American Style.
Fourth of July is always an exhilarating yet mind-numbingly frustrating time because of the beautiful fireworks displays that are over before you know it. I always have a couple of techniques planned but usually get sidetracked and end up with less than I was hoping for. Focal pulls, lens cap covers for more explosions in one frame, spins, zooms and tosses are but a few of the techniques I go for if I can remember. This year I managed a great pull but was disappointed in the trails being cut off at the top of the frame. A toss was not realized and the lens cap cover produced a wash of incoherent streaks. Better luck next year! Always fun for the manic photographer at any rate.

ID me?
This summer we saw an explosion of ant mimicking beetles with iridescent shells. The trick of course is getting them to stand still!
DIA corners 1

With summer also usually comes vacations. And for me that means DIA (Denver International Airport). I have dreamed about hanging out in prohibited areas taking shot of planes and art around the property but let me tell you the cops are on you faster than you can set up your tripod if you park in a no parking area. Again I come away with less than dreamed of material. When do I get a press pass?

 Visit the full set on Flickr for more uploads.

2011 May/June Colorful ColoRADo Ezine Edition

May/June 2011 - Inaugural Edition 

Welcome to my fantasy eZine "Colorful Colorado." Every two months, I include the best photos from my wanderings. One shot gets a glorified position on the 'cover' made with FD's Flickr Toys Magazine Cover application over at Big Huge Labs. This is a catch-up effort for the blog. 


17 is enuf
This month includes scenes from a trip to Pagosa Springs Colorado, famous for it's healing hot springs. This excursion was basically to get away from it all and luxuriate in the pools, which are some of the best in the state. Each one is maintained at a different temperature so that you can pick your experience. Mellow bath feel to scalding lobster pot numbing water. If you like the 'Polar Bear Club' thing, you can even hit the near freezing creek. After alternating between the hottest and coldest you won't be able to tell what temperature the water is as you will have confused all your nerve endings ;-)

Why did the turkey cross the road?
Staying at the resort isn't cheap, but you get 24-7 access to all the pools, which includes an adult only area. You will find ample photographic opportunities in the abundance of hiking trails and scenic roads nearby. Here's a hidden gem, well not really hidden but a bit of a trek and definitely off the beaten path: Fourmile Creek Falls.

The geese were out in full force at the golf course and even turkeys made an appearance. This trip included a golf round at the Pagosa Springs Golf Club, which is a nice way to spend an afternoon with the beautiful vistas at nearly every tee shot.


Crawlstroke to Pikes Peak
Garden of the Light Gods
Colorado Springs is a natural stop on the way back to the Front Range, but takes a little longer than coming through South Park. This time we made a point to visit the Garden of the Gods and especially at night, and stayed close by at the Garden of the Gods Club Resort. The Memorial at America the Beautiful is worth a visit but we just scratched the surface with this pass through, so another run is scheduled for next year almost certainly. Pikes Peak has many touristy attractions but the road is spectacular and warrants a day trip.

Time stands still for no one
Back at the home front, Mother's Day included a jaunt to Denver, where the St Patrick's Church was hopping, a near full moon begged for a lens cap trick shot (see the technique explained here), and a new spinner kite got a test flight. I hope you enjoyed the first edition of my eZine. You can also check out the complete set on Flickr, where more photos have been uploaded.

St. Patrick Mission Church

If you buy a kite, the wind will stop blowin

Tuesday, December 20, 2011

Camera Tossing Demystified

First of all you read it right. I am talking about throwing the camera into the air and letting go with reckless abandon. Watching my expensive gear do somersaults whilst capturing an image of the resulting chaos. Why would anyone do this? Maybe you are the shake tester at a camera manufacturer. Maybe you just want to check on that warrantee to see if they really do take the camera back no questions asked. Maybe you've totally lost it and this is proof positive that you need to have your head examined.

A little group was born on Flickr (almost certainly the best online photo management and sharing application in the world) circa 2005 that presented beautiful flowing abstracts that were different from anything I had ever encountered before. They weren't simply blurs or bokeh, zoom pulls, or camera waves. These were highly defined geometrical streaks, Spirograph-esque forms, and lush shapes that resulted from the process of applying kinetic motion to the camera as it exposed the frame.

I was a lurker (someone who watches without participating) for some time just enjoying the show thinking "yeah, that's cool stuff but I'm not going to do it!" Then when my Olympus point and shoot started to develop some problems out of warrantee I thought that maybe I'd give it a go. If I break this I thought, no worries it's on its way out anyway.

Most of my initial attempts were not very pleasing, you could tell where I had released the shutter making the first part of the spin irregular as seen in "Seven Flags Amusement Park."
 Seven Flags Amusement Park

Still, it was more interesting than any blur or wave I had tried.

Then I started achieving some nice smooth spins and experimenting with various light sources and I became hooked. The mantra had now become: But I'll never toss my DSLR! The more I tossed the more I noticed some limitations in the dynamics and balance of my point and shoot, and the lack of noise reduction that could be achieved. I had always practiced "safe tossing" meaning avoiding a chance of a drop on hard ground. So slowly but surely I worked up the nerve to toss my DSLR. Tentatively at first and now with reckless abandon. I am in no way condoning that you do this yourself without evaluating the risks. But the rewards are ample and yes I've even dropped the Mark II a couple times without adverse affect. Your mileage may will vary. It is a pretty tough little tank but there is a still a very good chance something could get knocked ajar. I'm probably approaching half life on the shutter activation count ~250,000 and if the camera died tomorrow it would have done its job.

String Toss #10
Now that the disclaimer is out of the way, let's get down to techniques. First, unless you use a timer and are good at judging the exact moment of release, you will no doubt have irregular shapes that lead in to the frame. This is not desirable and can be rectified a couple of ways. One way to achieve this is just practice. If your hands can start the motion before clicking the shutter, the motion can become seamless. You can also get better at timing the release if using the timer. The best method I've found is to use a bead bag chair for the landing pad and also to block the starting point of the spin. Stairs work well for this set-up. Position your light source(s) at some point possibly 2nd or 3rd rigger up, then yourself behind the bag at the landing. With the camera behind the bag, start the exposure and toss. Once the camera clears the bag it should be in stable flight, and as a bonus it will also land in comfort.

So you've got your flight path down, now you need to play with exposure times. Generally, I like .5 to 1 second. You will be able to judge from a few tests whether you like the length of the trails or not and adjust accordingly. Since you know about the golden triangle of exposure, you will know how much aperture you need and if that's not enough how much more ISO to boost.

Seaform #1
Next is your light source/sources. The sky is the limit. I find choosing fixtures with relatively equal luminosity is best, but it depends on what you are after. Then go for different textures. How do you get a texture from a light you might ask? Well, LEDs tend to generate defined streaks and neon bulbs are softer. Experiment with whatever you use to light paint with, it's all good.

After that you can go for perfectly circular spins to chaotic flips that resemble something an olympic diver might get high scores for. The possibilities are endless.

I have dedicated a store to these abstract light forms over at Zazzle. Postcards to stretched canvas, the collection includes all of the techniques I have noted here. Enjoy!
Check out the official Camera Toss Blog for more info, pointers and examples.

And I would be remiss in not mentioning some of the pioneers of tossing that you should visit to get a true taste of what the cutting edge of this crazy technique can result in. I owe many thanks to them for the support, encouragement, and continued inspiration: Ryan Gallagher, David Hull, and Jens Ludwig.

Harris Shutter

This technique was invented by Bob Harris, of Kodak. You may recognize it from ads and posters from the seventies. The idea is to shoot three separate exposures using red, blue, and green filters. This effect is only effective is parts of the scene are in movement, otherwise all the channels will overlap and cancel out.  Everything in movement will produce bright colors of different hues depending on the combination of RGB exposed in less than all 3 combined. 

More adventures in Harris Shutter
In the days of film this could be achieved by either using a different filter for each shot or employing a "drop through filter" of three gels and two opaque sections that could be slid through a holder during one exposure. Nowadays this can be achieved similarly with a digital camera. But it has been made easier still with software. 

The fall colors are great this year

I found a rich subject in aspen leaves, but any scene that has some static and moving features can be used. I've seen some great shots of people and cars moving around so it doesn't have to be a landscape.


Basically if you don't have access to the drop through filter or multiple in-camera exposures or individual gels, you'll need to use software to create these. The idea is to get your images open and modify the channel of each so that one will contain red, one blue, and one green. You can then merge the layers using the difference method. Of course different programs may not use this exact terminology, but that is the idea.

Eternal Sunshine of the Spotless Mind

Here is a waterfall with a nice mix of both elements:
That 70s Show - Fourmile Creek Falls
There are endless possibilities. I tried to capture smoke rising from a volcano but failed at that one. Next trip to Hawaii will have to give it another go.

There is a dedicated group for this method on Flickr: http://www.flickr.com/groups/harrisshuttereffect/.


Thursday, December 15, 2011

Lens Cap Trick

Many moons ago (literally) I was looking through the rift in the mountains that opens out onto a view of the plains from my mountain home, and noticed that the moon is always a few degrees out of the view. I never was able to capture a moonrise on the horizon from the comfort of my deck. There are only a few times a year that it gets even close but sadly it seems to avoid the spot that would give me a great 'huge moon illusion' right on the horizon or just above it. I guess that I only have about 5 or 10 degrees of horizon to work with.

Then one night sitting in the hot tub ruminating on the problem I had a duh moment and realized that I could place the moon anywhere in the frame that I wanted it using what I then dubbed a "blind pan" or "black zoom." I figured I could expose the moon, cover the lens, then re-frame the shot (thus pan and or zoom) and expose a different background. You don't have a view thru the finder while the mirror is locked up, and so the blind or black part. I tried a few times and in theory it worked, but the results were ugly. Moons superimposed on trees or mountains etc. But after more trial and error, I learned I could compose both parts of the shot individually to get each exposure and position correct, then go on to the actual double exposure.  My first useable post:

Passed over
Which obviously had many "pans."  You can see the curved tripod path that put the moon on an impossible trajectory. It also has flaws like the light that is supposed to be coming from behind the trees but isn't blotted out by them. In spite of this  I got pretty excited about it and kept trying. After a ton of bloopers, my first post to Flickr went stratospheric (still #1 in Explore for Nov 6, 2006 http://www.flickr.com/explore/interesting/2006/11/):

Alien Shore
Okay so now I was hooked. I later discovered that this was a fairly old trick using film and exposing the moon over a roll, then rewinding and double exposing the backgrounds later. My digital camera at the time did not have the double exposure function, so this was the only way for me to achieve it. I also learned that this technique had been used for firework displays to get more explosions on a frame. It helps to have a lens with a large range, so that the moon can be captured at maximum zoom, and then a low end wide enough to capture a decent background. The dream lens is of course a Sigma 50-500mm. Okay so I don't own one but I have owned 300m and 20mm lenses at the same time. Thus lens swapping was born (at least to me - I don't claim to have invented it). This entails using the long lens to snap the moon, then cloaking the camera (I use a dark towel) whilst removing the first lens and then attaching the wide angle. Making sure the direction and focus is set, snap the towel off the gear - just like a magician would pull a table cloth off a fully set and stocked table - just kidding, and then let the background expose. Here is an example of this:

Welcome to Vancouver, Ganymede
Blind pan and Black zoom are sort of clumsy phrases and never really stuck. I started playing around with other things that could be used besides the moon and got into light painting using various light sources.

This caught on and the term lens cap trick was adopted by the community. That is what I will be calling this technique from now on. Only a few that I know of have tried this with the moon but there are lots of great light painting examples. First one of mine (well it's not Explorer kind of great but I like it). This one incorporates a still of a Gumby model and then a camera toss which I will blog later about:  

Gumby Weeeee
Some of my favorite examples on Flickr include light paintings by ectro, Hyphy Hands Lincoln, and Hob. Or just do a search to find your own faves: lens+cap+trick search.

Check out the Light Junkies group for more information on light painting. Here is the official LCT tut from my profile on Flickr:

Zoom in on the moon and take as many shots as needed to understand where your exposure time needs to be to keep from "blowing it out" (losing the detail).
Then do the same for the second exposure and make sure you have some kind of reference so you can know where to aim.
Finally, point back at the moon and lock the shutter release. After the determined exposure time, cover the lens and then re-aim to the second spot. Zoom out and uncover the lens for the determined second exposure. Release the lock. Pray. Repeat as needed. Or just take 2 photos and layer them in Photoshop. But what's the fun in that?


I'd like to showcase some of the artists that have attempted this with the moon. All photos used here with the permission of their respective copyright owners.

Jon Steele (mccullin4): http://www.flickr.com/photos/mccullin4/6686986389/in/photostream/

Rohit Markande: http://www.flickr.com/photos/rohitmarkande/2282519270/

Eric Yeadon (The Capturer): http://www.flickr.com/photos/yeadon/406841816/ 

Mike Ross (TxPilot): http://www.flickr.com/photos/txross/7196438036/